The Christmas Dress
Since I’ve been smocking, people seem surprised to find out I make Danielle’s special occasion dresses. I like the compliments, but I always hear the same questions and comments:
“You must be a stay-at-home mom.”
Actually I’m not. I work full time.
“When do you ever find the time?”
I don’t usually watch TV and have almost totally given up all other hobbies and reading for pleasure in order to smock. I try to stitch after the kids go to bed until it’s time for me to go to bed. It was much easier to find time on the weekends when both kids used to take naps. I try to make the best use of my time and bring my smocking with me if I know I will have a long wait in the doctor’s office or sometimes bring my smocking to the office to work on while on my lunch break.
“I could never do that. I don’t have the time/patience/talent.”
Where there’s a will… I don’t think of myself as a patient person just determined and tenacious.
“How long does it take you to make that?”
It’s hard to answer that question because I don’t keep an accurate count of man-hours spent. It depends on the detail of the dress. Some dresses I can get out in a few weeks and some takes me months. It depends on what else is going on in my life, which is usually a lot. I can say, bishop dresses don’t take as long because there are fewer pieces to assemble. Yoke dresses usually take less time to smock because you don’t have to smock the front and back (this of course depends on the detail and whether you are just smocking an insert or the full front bodice), but they take more time to assemble at the end. Picture smocking takes the longer than geometric smocked patterns because your smocked rows have to be perfectly stacked in order to create the picture.
“You should sell your work and do this full time.”
Thanks, but no. I could never make my salary doing this full time. A smocked dress in a specialty store costs between $45 and $85. If I spend 50+ hours making a dress, no one would be willing to pay me minimum wage in the time it took to make let alone the costs of materials.
“Will you make me a dress for my daughter/granddaughter?”
I said yes once and regret it. I have the dress cut, but because I’m wrapped up in all of Danielly’s Easter/Mother’s Day/Christmas/ birthday dresses, I don’t have the time to pleat or smock it. I hate breaking a promise, but I really can’t see how I will be able to finish the promised dress. Every dress I make for someone else is one dress less Danielle will have. People just don’t realize the time it takes to do handiwork. It’s not something that you can just whip up in a weekend.
One friend at work comments: “Just make it easy on yourself and buy her a smocked dress.”
I have some garment labels I bought that read “Made With Love by Mommy” and that is reason enough that I do what I do. When it is all said and done I have a finished dress I’m proud of and can account for my time. It’s better than spending hours in front of TV.
Usually I don’t keep track on “how long it takes”. I stitch until I’m interrupted (which is frequently) or get tired (which is also frequently), so there are a lot of starts and stops to keep track of. With Danielly’s Christmas dress, I kept a journal of the time spent and took pictures of the work in progress.
I took a week off from work back in November to have uninterrupted time to selfishly stitch while the kids were in school or at daycare and the husband was at work. Here’s how the process went.
The smocking pattern of the snowmen bishop came from Sew Beautiful, Issue 96 and was designed by Allison Burris.
I searched high and low at all the fabric stores for the perfect color blue to make this bishop. I can’t tell you how long that took or how much time I spent searching for the perfect lace and little snowflake buttons.
The Sew Beautiful issue recommended Chery Williams’ bishop pattern, but not all bishops are created equal. It took me about two hours of searching my back issues of Australian Smocking and Embroidery (AS&E) to decide on which bishop pattern I would use. I took a plain piece of paper and traced where the armhole would be for six different bishops from old AS&E issues along with Chery Williams’ pattern, Children’s Corner pattern, and Ellen McCarn’s bishop patterns. I finally decided to go with Ellen McCarn’s bishop pattern. Looking back I probably should have gone with the less full Chery Williams’ version since the material I used was a heavier weight of cotton.
A warning on the Chery Williams’ bishop pattern: If you want the traditional 4-inch hemline, lengthen the pattern because they run short. A size 4 Chery Williams bishop is 22-1/2 inches long, the same size Ellen McCarn’s bishop is 28 inches long.
My Sew Beautiful inspiration picture had a short-sleeved version. I hate to see a little girl shiver in the winter because her mother put her in a short sleeved Christmas dress. I went with the long-sleeved version. It’s now two days before Christmas and the weather here has been in the mid to upper 60’s. In retrospect, I could have made cute little capped sleeves instead and Danielle would have been fine.
Day 1 of my smocking vacation (7-1/2 hours of work):

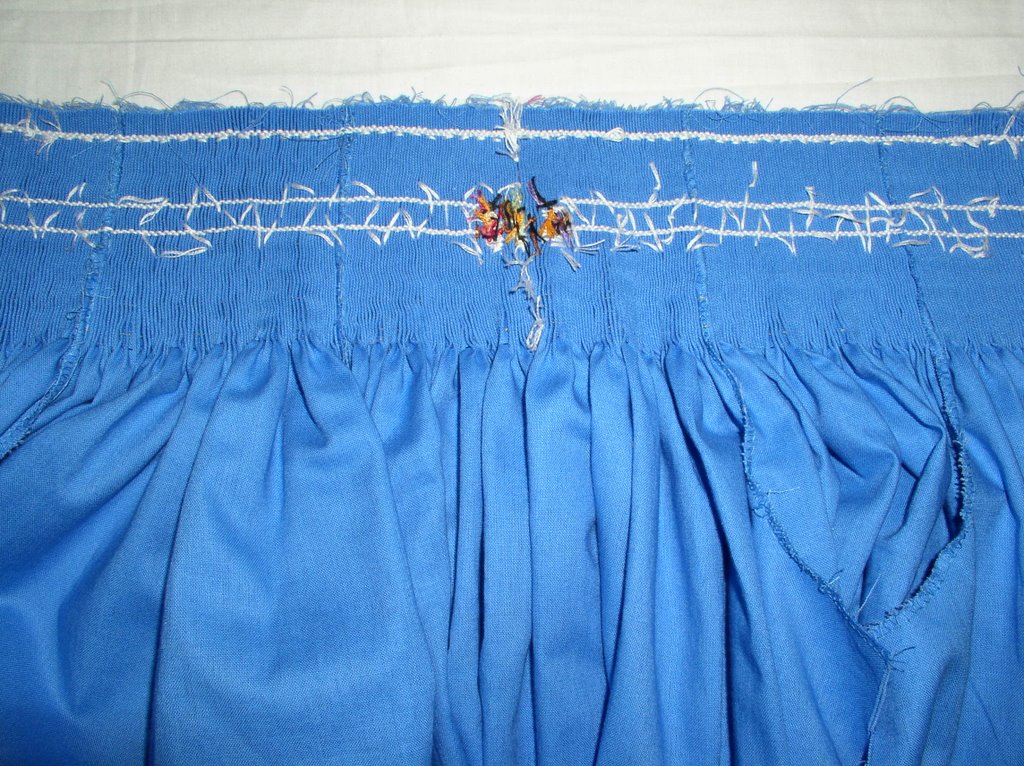
I traced a size 4 bishop pattern on butcher’s paper and cut it out. I pinned the pattern pieces to my fabric and cut the dress out. I assembled all 5 pieces (to include trimming my seam allowance and zig-zagging the seams) before I realized one of the sleeves had a hole right in the middle of it. The fabric had an imperfection that I hadn’t noticed when I had laid the butcher’s paper over it. I ran my finger over it and the hole started to get bigger. It wasn’t just a slight imperfection. I had to carefully remove the sleeve, cut another one out and replace it. Replacing it was harder because I had less of a seam allowance to work with since I had already trimmed. I then had to pleat the holding rows. The fabric was thicker than I had expected and ended up breaking or bending needles midway though the pleating process. Pleater needles average a $1 a piece, and I ruined 6 in pleating this dress. I’ve read articles on how to replace a broken needle without having to start the pleating process all over again, but I can’t seem to make it work right. I wound up just removing the holding rows and starting over. It was finally successful after several attempts. I used quilting pins to find my center, used Fray-check on the top to prevent fraying, and called it a day.
Day 2 of my smocking vacation (8 hours worth of work):

I was only able to complete the top 4 rows of smocking.
Day 3 of my smocking vacation (6 hours worth of work):

Completed the bottom three rows of smocking and started on the scoops on the bottom.
Day 4 of my smocking vacation (10 hours):
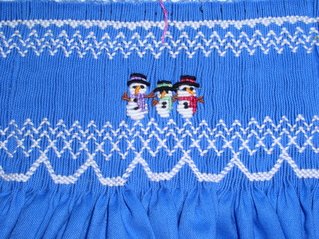
3 hours were spent finishing the scoops on the bottom. 7 hours were making the bullion snow family.
Day 5 of my smocking vacation (7 hours):

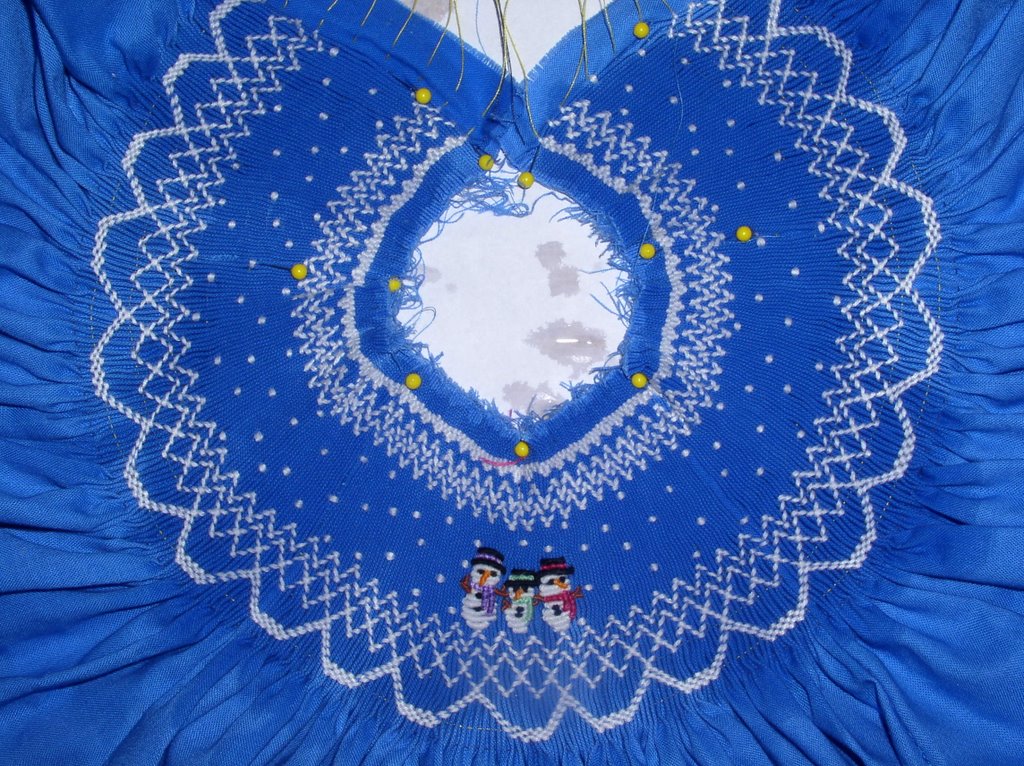
I filled in the “snow” and did back smocking. You would think the snow would be the easy part, but it wasn’t. There wasn’t a pattern to follow, just random stitches. I’m a visual person and don’t do well conceptualizing. I used pinheads to figure out what the finished smocked “snow” would look like.

Although it wasn’t needed to hold the fabric in place, I back smocked the top row as a mirror image of my front smocking. I have found by using the smocked cable on the back as a guide on my sewing machine, I make perfect necklines every time. The middle two rows of back smocking are needed to hold the fabric in place when the holding threads are removed.
Blocking:

I know some smockers who do not block their work. I always do after I discovered not doing so on a bishop dress could cause an undesired turtleneck effect. I block after I have smocked. I pin the dress down on a small cork bulletin board using a bishop neckline guide, spritz it down with water and leave overnight. (Approximately 1 hour of time spent.)
I spent another 10 hours assembling the dress – placket insertion, neckline binding, sewing lace on the sleeves, inserting elastic in the sleeves, sewing seams, hemming dress, hand stitching button loops, and placing buttons. Putting in a placket is always the most difficult part for me no matter how many times I’ve done it.
The finished product:


All totaled, 50-1/2 hours worth of work. Is it worth it? To hear my darling daughter exclaim, “Mom, it’s gorgeous!” Priceless. That’s something money can’t buy in a store.
I made Aden a navy blue vest to wear on Christmas Eve, too. His has snowmen buttons that match the snowmen smocked on Danielly’s dress.
“You must be a stay-at-home mom.”
Actually I’m not. I work full time.
“When do you ever find the time?”
I don’t usually watch TV and have almost totally given up all other hobbies and reading for pleasure in order to smock. I try to stitch after the kids go to bed until it’s time for me to go to bed. It was much easier to find time on the weekends when both kids used to take naps. I try to make the best use of my time and bring my smocking with me if I know I will have a long wait in the doctor’s office or sometimes bring my smocking to the office to work on while on my lunch break.
“I could never do that. I don’t have the time/patience/talent.”
Where there’s a will… I don’t think of myself as a patient person just determined and tenacious.
“How long does it take you to make that?”
It’s hard to answer that question because I don’t keep an accurate count of man-hours spent. It depends on the detail of the dress. Some dresses I can get out in a few weeks and some takes me months. It depends on what else is going on in my life, which is usually a lot. I can say, bishop dresses don’t take as long because there are fewer pieces to assemble. Yoke dresses usually take less time to smock because you don’t have to smock the front and back (this of course depends on the detail and whether you are just smocking an insert or the full front bodice), but they take more time to assemble at the end. Picture smocking takes the longer than geometric smocked patterns because your smocked rows have to be perfectly stacked in order to create the picture.
“You should sell your work and do this full time.”
Thanks, but no. I could never make my salary doing this full time. A smocked dress in a specialty store costs between $45 and $85. If I spend 50+ hours making a dress, no one would be willing to pay me minimum wage in the time it took to make let alone the costs of materials.
“Will you make me a dress for my daughter/granddaughter?”
I said yes once and regret it. I have the dress cut, but because I’m wrapped up in all of Danielly’s Easter/Mother’s Day/Christmas/ birthday dresses, I don’t have the time to pleat or smock it. I hate breaking a promise, but I really can’t see how I will be able to finish the promised dress. Every dress I make for someone else is one dress less Danielle will have. People just don’t realize the time it takes to do handiwork. It’s not something that you can just whip up in a weekend.
One friend at work comments: “Just make it easy on yourself and buy her a smocked dress.”
I have some garment labels I bought that read “Made With Love by Mommy” and that is reason enough that I do what I do. When it is all said and done I have a finished dress I’m proud of and can account for my time. It’s better than spending hours in front of TV.
Usually I don’t keep track on “how long it takes”. I stitch until I’m interrupted (which is frequently) or get tired (which is also frequently), so there are a lot of starts and stops to keep track of. With Danielly’s Christmas dress, I kept a journal of the time spent and took pictures of the work in progress.
I took a week off from work back in November to have uninterrupted time to selfishly stitch while the kids were in school or at daycare and the husband was at work. Here’s how the process went.
The smocking pattern of the snowmen bishop came from Sew Beautiful, Issue 96 and was designed by Allison Burris.
I searched high and low at all the fabric stores for the perfect color blue to make this bishop. I can’t tell you how long that took or how much time I spent searching for the perfect lace and little snowflake buttons.
The Sew Beautiful issue recommended Chery Williams’ bishop pattern, but not all bishops are created equal. It took me about two hours of searching my back issues of Australian Smocking and Embroidery (AS&E) to decide on which bishop pattern I would use. I took a plain piece of paper and traced where the armhole would be for six different bishops from old AS&E issues along with Chery Williams’ pattern, Children’s Corner pattern, and Ellen McCarn’s bishop patterns. I finally decided to go with Ellen McCarn’s bishop pattern. Looking back I probably should have gone with the less full Chery Williams’ version since the material I used was a heavier weight of cotton.
A warning on the Chery Williams’ bishop pattern: If you want the traditional 4-inch hemline, lengthen the pattern because they run short. A size 4 Chery Williams bishop is 22-1/2 inches long, the same size Ellen McCarn’s bishop is 28 inches long.
My Sew Beautiful inspiration picture had a short-sleeved version. I hate to see a little girl shiver in the winter because her mother put her in a short sleeved Christmas dress. I went with the long-sleeved version. It’s now two days before Christmas and the weather here has been in the mid to upper 60’s. In retrospect, I could have made cute little capped sleeves instead and Danielle would have been fine.
Day 1 of my smocking vacation (7-1/2 hours of work):

I traced a size 4 bishop pattern on butcher’s paper and cut it out. I pinned the pattern pieces to my fabric and cut the dress out. I assembled all 5 pieces (to include trimming my seam allowance and zig-zagging the seams) before I realized one of the sleeves had a hole right in the middle of it. The fabric had an imperfection that I hadn’t noticed when I had laid the butcher’s paper over it. I ran my finger over it and the hole started to get bigger. It wasn’t just a slight imperfection. I had to carefully remove the sleeve, cut another one out and replace it. Replacing it was harder because I had less of a seam allowance to work with since I had already trimmed. I then had to pleat the holding rows. The fabric was thicker than I had expected and ended up breaking or bending needles midway though the pleating process. Pleater needles average a $1 a piece, and I ruined 6 in pleating this dress. I’ve read articles on how to replace a broken needle without having to start the pleating process all over again, but I can’t seem to make it work right. I wound up just removing the holding rows and starting over. It was finally successful after several attempts. I used quilting pins to find my center, used Fray-check on the top to prevent fraying, and called it a day.
Day 2 of my smocking vacation (8 hours worth of work):

I was only able to complete the top 4 rows of smocking.
Day 3 of my smocking vacation (6 hours worth of work):

Completed the bottom three rows of smocking and started on the scoops on the bottom.
Day 4 of my smocking vacation (10 hours):

3 hours were spent finishing the scoops on the bottom. 7 hours were making the bullion snow family.
Day 5 of my smocking vacation (7 hours):

I filled in the “snow” and did back smocking. You would think the snow would be the easy part, but it wasn’t. There wasn’t a pattern to follow, just random stitches. I’m a visual person and don’t do well conceptualizing. I used pinheads to figure out what the finished smocked “snow” would look like.
Although it wasn’t needed to hold the fabric in place, I back smocked the top row as a mirror image of my front smocking. I have found by using the smocked cable on the back as a guide on my sewing machine, I make perfect necklines every time. The middle two rows of back smocking are needed to hold the fabric in place when the holding threads are removed.
Blocking:
I know some smockers who do not block their work. I always do after I discovered not doing so on a bishop dress could cause an undesired turtleneck effect. I block after I have smocked. I pin the dress down on a small cork bulletin board using a bishop neckline guide, spritz it down with water and leave overnight. (Approximately 1 hour of time spent.)
I spent another 10 hours assembling the dress – placket insertion, neckline binding, sewing lace on the sleeves, inserting elastic in the sleeves, sewing seams, hemming dress, hand stitching button loops, and placing buttons. Putting in a placket is always the most difficult part for me no matter how many times I’ve done it.
The finished product:


All totaled, 50-1/2 hours worth of work. Is it worth it? To hear my darling daughter exclaim, “Mom, it’s gorgeous!” Priceless. That’s something money can’t buy in a store.
I made Aden a navy blue vest to wear on Christmas Eve, too. His has snowmen buttons that match the snowmen smocked on Danielly’s dress.
posted by Jen at 12:04 PM
![]()

5 Comments:
Perfection Jen!
I get really tired of all those type of comments about the things I do too. Ultimately, the reason we smock or make anything is for the love of doing it and the smiles we get from our little ones. Keep on. :)
It's gorgeous. I'm online tonight trying to figure out how to get the bishop I've just put together through the pleater. I've never done a bishop before, only yoke dresses.
Beautiful! I'm a smocker too, so please visit my blog at www.retrograce.blogspot.com
Your work is wonderful!
Your smocking and sewing are BEAUTIFUL!! I am now smocking for our 1st grandbaby - a precious little girl. Such a joy.
Any words of wisdom on the neck band of the bishop?
Thanks!
I enjoyed your post. We get great satisfaction making beautiful things by hand. The moment it becomes required, it ceases to be a pleasant. It is a blessing to just be able to make beautiful clothing for our own children without making a living off of it.
Julie
Smocked Clothing for Children
Post a Comment
<< Home